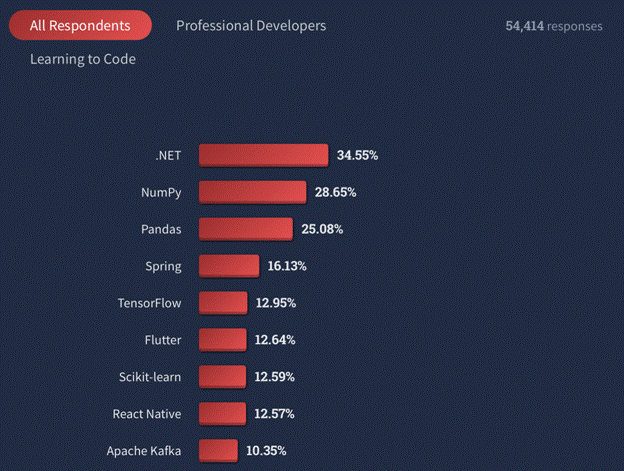
In Stack Overflow’s 2022 Developer Survey, .NET ranked first in the “other framework and libraries” category.
This is no surprise because .NET is one of the best frameworks when it comes to scalability and building high-quality and dynamic apps.
If you are one of the people who uses the .NET framework to make an app, it is time to hire .NET developers to configure it.
Why do we need configuration?
Configuration can help your app perform differently, how you want it without having to recompile it. Hire .NET developers to make your app flexible for different environments.

In this article we will give you tips on how one can manage .NET app configuration effectively and efficiently.
1. Create application settings at design time
Create application setting at the design time, by using:
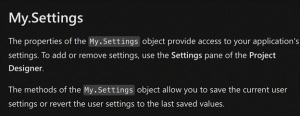
- The Settings page of the Project Designer, or
- The Properties window for a form or control, which allows you to bind a setting to a property.
Application-scoped settings like a database connection string, or a reference to server resources are saved in app.config with the <applicationSettings> tag.
Connection strings are saved under the <connectionStrings> tag.
User-scoped settings like default font, home page, or window size are saved in app.config with the <userSettings> tag.
This will help you:
- Store application information dynamically.
- Store information on the client computer that shouldn’t be included in the application code.
- Replace dynamic properties used in earlier versions of Visual Studio.
2. Change the setting of your app
Use the Scope property to alter your app’s setting type.
The project system maintains application settings in two XML files.
An app.config file
This is created at design time when you define the first application setting.
Use this setting for information such as a URL for a web service or a database connection string. Because these values are associated with the application, users can’t change them at runtime.
Take security measures when storing connection strings to prevent exposing sensitive data, such as passwords or server routes, in the connection string.
Make sure that the values you use to construct your connection string do not contain any additional connection string parameters. If you use connection string information from an external source, such as a user providing a user ID and password, it can change the behaviour of your connection.
Encrypt critical data in the configuration file with the Protected Configuration option. Check protecting connection information for more.
A user.config file
This is created at runtime whenever a user running the app changes the value of any user setting.
This setting should be used for information such as persisting the last position of a form or a font preference. The values can be changed by the users at runtime.
Note – Unless the application specifically calls a method to write changes in user settings to disk, it won’t write the changes.
3. Use customized settings files
Customized settings files make it easier to manage a group of settings. Settings are usually contained in a single file and are loaded and saved as a unit. If you use separate files for frequently used and infrequently used groups, you can save time in loading and saving settings.
Here’s an example.
You add a file such as SpecialSettings.settings to your project. While your SpecialSettings class isn’t exposed in the My namespace, View Code can read the custom settings file that contains Partial Class SpecialSettings.
4. Use the My.Settings object
You should use the My.Settings object and the default .settings file to access settings.

This will automatically save your settings before the application closes. You can use the Settings Designer to assign properties to settings
Your Visual Basic programme can directly access settings. To fix that use a custom.settings file in the project’s root and access the MySettings class. As you would with a C# application, you must save the user settings before closing the programme.
5. Configure data in order
Data can be read from a number of different sources like JSON files, environment variables, Azure Services and more.
Here’s a list of all the different sources:
- Settings files, such as appsettings.json
- Environment variables
- Azure Key Vault
- Azure App Configuration
- Command-line arguments
- Custom providers, installed or created
- Directory files
- In-memory .NET objects
You can go to appsettings.json and access the host configuration. This will help you configure the data in a certain order.
You should avoid placing sensitive data in a service like Azure Key Vault, avoid placing such data in configuration files.
How to read the data?
To read configuration data, you can use:
public Startup(IConfiguration configuration)
{
Configuration = configuration;
}
After this, inject an instance of IConfiguration to read data from appsettings.json file.
It should like:
{
“Logging”: {
“LogLevel”: {
“Default”: “Information”,
“Microsoft”: “Warning”,
“Microsoft.Hosting.Lifetime”: “Information”
}
},
“AllowedHosts”: “*”
}
You can read a non-nested value like AllowedHosts with,
Configuration[“AllowedHosts”] // *
6. Type your configuration
You might lose track of what configuration you have. You might have 10-20 different keys, or more, at various levels of nesting.
It can get very chaotic.
You need to know what keys are used for looking into JSON files, environment variables or even the source code.
Meet a record of the data. Have variables or structures like classes for most things you plan to use.
Here is an instance of creating such a class.
class ServiceConfiguration
{
public const string Services = “Services”;
public string ProductsServiceUrl { get; set; }
public string CartServiceUrl { get; set; }
}
7. Containerize your .NET application
Containerising your .NET application, will help you:
- Separate test environments with Docker containers.
- Maintain consistency between development and production,.NET by coding and testing locally.
- Remove production environment deployment problems brought on by missing dependencies.
- Enable the creation, sharing, and execution of containerized .NET applications by developers of all skill levels.
How to containerize a .NET application?
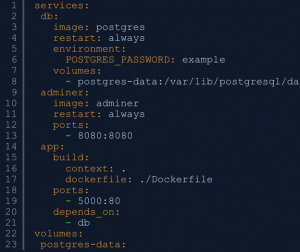
Clone a GitHub project repository and use the Docker Compose CLI to bring up the complete application. Use the command:
git clone https://github.com/dockersamples/(name of the database)
Change your directory to student-record-management. You should see a Docker Compose file that looks like:

You can hire .NET developers to use the Dockerfile template to Dockerfile image. Your container image is created using a series of consecutive commands called a Dockerfile. Each layer in this image, which is made up of a stack, corresponds to a command in our Dockerfile.
Hire .NET developers to help you with different kinds of configurations. We have only provided tips and an overview. A skilled professional can:
- Configure file format.
- Use a machine configuration file for settings that apply to an entire computer.
- Use application configuration files for configuring things like assembly binding policy
- Configure the code group hierarchy and permission sets associated with a policy level by using security configuration files.


