
A properly functioning kitchen ventilation system is essential for maintaining a healthy and comfortable cooking environment. Without adequate ventilation, your kitchen becomes susceptible to accumulated grease, lingering cooking odors, excessive moisture, and potentially harmful airborne particles. These issues not only affect air quality but can also damage your cabinets, walls, and ceiling over time. Installing a range hood addresses these concerns by actively removing smoke, steam, and contaminants while you cook.
Installing a range hood that is properly fitted will not only bring you the benefits of good health and hygiene but will also increase your kitchen’s working capacity as well as the value of your house. The air remains free from mold, which is a result of excessive humidity; your home’s surfaces are kept free from the packing of greasy matter, and the whole process of cooking becomes fun through it. If you are doing a kitchen renovation or planning a new build, it is still very beneficial to know the installation process so that you can be the one making the right decisions.
The present manual is a step-by-step guide to the installation of kitchen ventilation, starting with the choice of a suitable system and finishing with the last range hood’s efficient working hours to be guaranteed.
Understanding the Basics
Range hoods are available in two major types based on how they manage the waste of the cooking process. Ducted range hoods are attached to an outside ductwork that vents air out of your house, thus making them the most efficient means for the removal of smoke, heat, moisture, and odours. Such systems need access to an outer wall or the roof and have a complicated installation process, but they give the best air quality as they take the pollutants out of your living space entirely.
On the other hand, ductless range hoods, which are also known as recirculating hoods, draw air through the use of a charcoal or carbon filter and then release it to the kitchen. Even though they are not very difficult to install, as they do not require an external vent, they are less capable of getting rid of the heat and moisture. In order to keep the efficiency of the filters, they have to be replaced regularly. Ductless models are great for apartments or houses where venting outside is not an option, but a ducted system is still the best solution if the structure is suitable for the installation of a proper ductwork.
Planning the Installation
First of all, exact measurements are the main thing when doing a proper range hood installation and avoiding situations where you might either underestimate or overestimate, thus losing money. So, measure the top of your stove or range as the hood must be at least the same width or a little bit wider for all the cooking emissions to be captured effectively. Standard range hoods come in 30, 36, or 42-inch widths to correspond to the most common stove top sizes.
While you are at it, measure the height from the stove top surface to the bottom of the existing cabinets or the ceiling, as it is generally required to maintain 24-30 inches clearance above electric cooktops and 28-36 inches above gas ranges for the safe and efficient operation when installing a range hood.
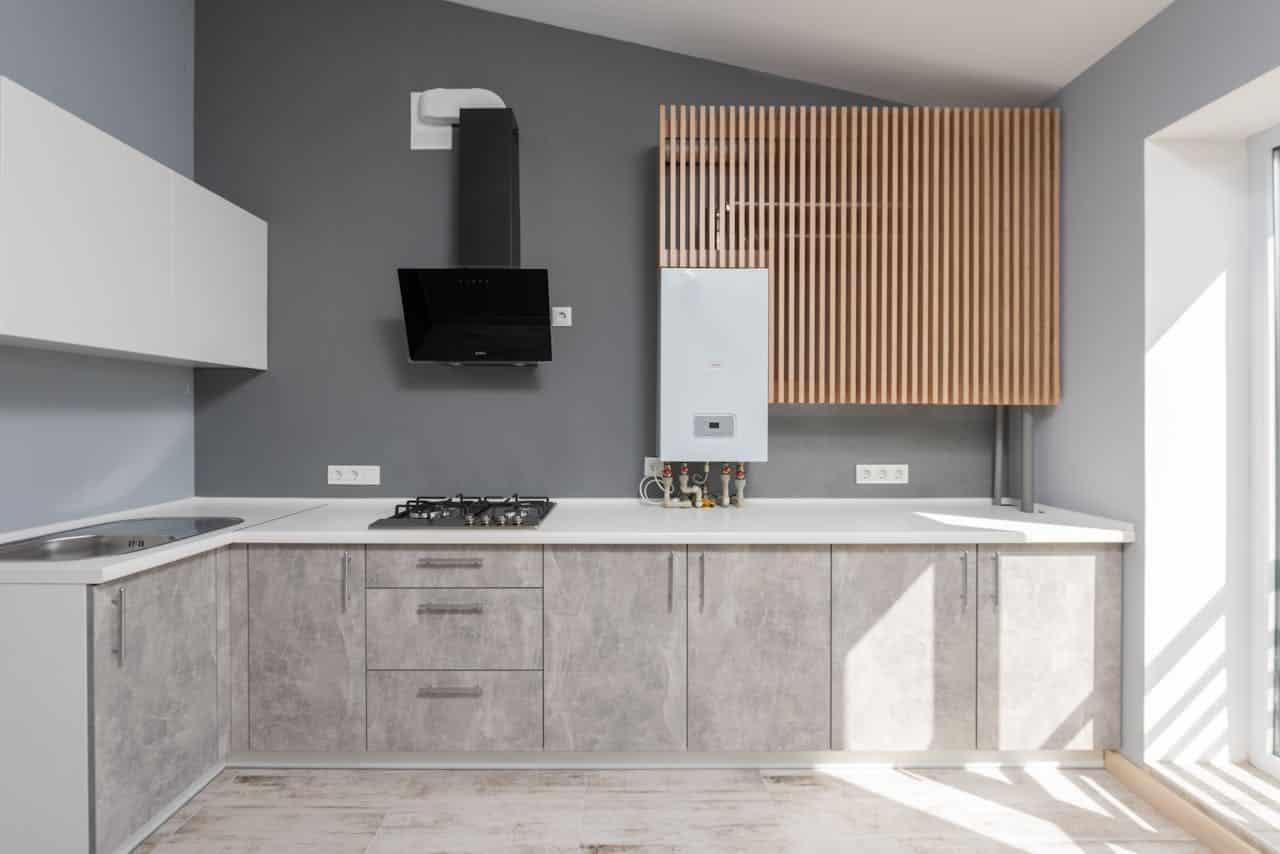
Choosing the Right Location
Position your wall mount range hood directly above the cooktop, centred for balanced air capture. The hood should extend slightly beyond the cooktop edges on both sides when possible. Consider the path for ductwork if installing a vented system—the shortest, straightest route to an exterior wall or roof maximises efficiency and reduces installation complexity. Avoid locations where ductwork would need multiple turns or excessive length, as each bend reduces airflow by approximately 10 per cent. Ensure adequate clearance from combustible materials and verify that wall studs can support the hood’s weight.
Gathering Necessary Tools and Materials
Apart from that, you should have the right tools ready before you start if you want to successfully install a range hood. Getting everything up front saves you the whole day and keeps you from having to stop at a critical part of the installation and continue later on. What tools you use will be partly determined by whether you are installing a ducted or a ductless system and the materials your house is made of. In most cases, you will need to use your regular hand tools, power tools for drilling and cutting, some electrical works for wiring and connecting, and fastening hardware to secure the hood firmly. Besides, don’t forget to check your range hood installation manual to find out what exactly you need because some manufacturers may include the mounting brackets or a template, while some may require you to buy them separately. Having a person to support you will also be a great idea, as it will be safer and easier, especially when you need to lift and position the hood.
Common Tools
Power drill with various bits, and screwdriver set (both flathead and Phillips) are the must-have power tools. Moreover, the list of tools should also have a stud finder, a tape measure, a level, and a marking pencil. Besides that, an adjustable wrench, wire strippers, and a voltage tester would be very useful for you if you are doing electrical work. Safety goggles must be worn during the execution of the work, and a ladder or a step stool will be needed to access the upper parts of the kitchen. If you have ducted installations, you will also require tin snips, a reciprocating saw, or a jigsaw, and a hole saw that matches the diameter of your ductwork.
Materials Needed
The list of materials is led by a range hood unit. Besides that, vented systems will need ductwork sections, and there should be duct tape or foil tape to bind them. The other materials to help the installation of a vented system are an exterior vent cap with a damper, screws and anchors for the mount, wire nuts for the electrical connections, and a cable if you need to extend the wiring. Lastly, there should be caulk or a sealant to cover the exterior penetrations and replacement charcoal filters if you are setting up a ductless model. Each part of the air duct system should go together perfectly and be of the same outlet size as your kitchen hood. Several hardware stores have made the buying process very convenient by providing full exhaust installation kits with which you get ready-to-use ductwork, the necessary hardware for the installation, and the sealing materials.
Kitchen Preparation
Excellent prep work will not only provide you with a safe working environment but also ensure that your kitchen is not harmed during the installation process. One of the very first things to do in this case is definitely turning off the power in the area at the circuit breaker, thus getting rid of the risk of electric shock. Make use of drop cloths or cardboard to cover your cooktop and the surrounding counters so that they are protected from the tools, the debris, and any incidental scratches.
Remove things from the shelves and countertops that are close to you and can still fall or block your way. If the installation of your ducted system is going to involve cutting the wall or ceiling, make sure that you are covering the floor with something that will not only protect it but also catch the dust and debris. Vacuum your floor after every step in order to keep your working area clean throughout the project.
Understanding the location of the electrical wiring and water lines in the walls will guarantee that you won't be drilling or cutting into them by mistake.
Making Space
The first and most important action is to remove all things that are around not only the cooktop but the adjacent counter as well, in order to have at least three feet of free workspace on every side. Furthermore, removing the decorative things, utensil holders, or small appliances that could be on the walls and shelves around you is a good idea. In case it is necessary, you can also momentarily take down or detach the lighting fixtures that are hanging in your working area. There should be no obstacles that separate your working area from the door so that you can be able to move the tools and materials from one place to another without any problems. Also, check that your ladder is on a firm surface and that there is nothing underneath it that can cause it to slip.
Removing Cabinets
In case there are cabinets installed on the wall where you are going to put your range hood, it is better to first empty them and then take them down. Remove the screws and brackets holding the cabinet to the wall studs, at the same time, help with your hand lifting and supporting the cabinet as you take off the final screws. Get a friend or family member to help you hold the cabinet so that it doesn’t fall during the process. Besides that, you may find it convenient to put labels on any hardware you take off for possible reinstallation later.
Installing the Range Hood
Step 1: Mounting the Hood
Firstly, the wall studs must be located with a stud finder, and then the spots where the range hood is going to be mounted should be marked with a pencil. As most of the time, a mounting template or a bracket that can be attached to a wall is included with the range hoods. Temporarily attach the template to a wall at the height you decided, and after checking that it is level, mark the spots where holes need to be drilled for screws. Use a drill to make pilot holes in the studs where you located them and then, with the help of the screws provided with your hood, attach the bracket tightly. In case it happens that the studs do not line up with the holes in your bracket, put heavy-duty toggle bolts or wall anchors that are strong enough for the hood’s weight. After the bracket is secured, gently take the range hood to its place – usually, two people are needed because of the hood’s weight and size. Move the hood so that it fits the mounting bracket and, as per the manufacturer’s instructions, slide it in. Next, ensure the connection is secure, and the hood is level with the help of the hardware provided, which is used to fasten the hood to the bracket.
Step 2: Connecting the Duct
If it is a ducted installation, then find a place where the ductwork can exit through a wall on the outside or the roof. Also, make sure that the chosen path is the shortest one with the fewest bends. Mark the point from where the hole for the duct will be made and, by using a drill, make a small hole from the inside to check where the point is on the outside. Use the hole saw that is of the same size as the duct to cut the wall from the outside. The first part of the rigid metal ductwork should be connected to the exhaust outlet of the range hood, and it should be secured either by foil tape or duct clamps. Standard duct tape should not be used because it is heat that degrades it. The connection of the duct sections should be continued till the point where the outside opening is. Also, all joints should be facing away from the hood so that condensation does not leak. At the exterior wall, the vent cap should be installed with the damper facing downward in order to prevent rain from entering. Exterior-grade caulk should be used for sealing the area around the cap so that it is weatherproof and air-tight.
Step 3: Testing the Ventilation
Check the tightness and sealing of all ductwork joints before connecting the electronics. The electrical wiring of the range hood has to be connected to the power supply of the house while observing the colour-coding. That means the black wire should be connected to the black (hot) wire, the white to the white (neutral) and the green or bare copper to the ground. Connections should be wire-nutted, and for a further safety measure, they should be wrapped with electrical tape as well. Wires should be neatly stuffed in the junction box, and the hood’s electrical cover plate should be attached. The power should be restored at the circuit breaker, and the range hood should be turned on at its lowest setting to see if it is functioning properly. Strange sounds, like vibrations or rattling should be listened for when the ventilator is operating. It is trying to tell you that the ductwork or the mounting hardware is loose. The fan speed should be increased to the maximum, and it should be checked whether the operation is smooth at every level. Airflow through the intake can be checked with the help of a tissue, which should be held near the hood while it is operating. If the system is ducted, fresh air should be able to come from the outside through the vent cap, and thus, the latter has to be checked.
Step 4: Final Adjustments
If, after the last installation, the hood does not seem to be perfectly horizontal, you can definitely loosen the screws a little, then reposition it and only after that, tighten the screws again. Besides that, it is very important to make sure that all screws and fasteners are fully tightened. Put the grease filters according to the directions and switch on the lights to see whether all bulbs are working properly.
Maintaining Your Kitchen Ventilation System
By mounting a kitchen range hood, you are making your cooking area a healthier and cozier place as well as saving the rest of your house from the harmful effects of smoke, grease, and moisture. If you go through the guidelines one by one, you will be able to carry out this necessary home upgrade job with your own power and assurance. Besides, a well-executed exhaust installation is a great quality-of-life upgrade: it keeps the air fresh, it is less hard and time-consuming to clean, and your kitchen becomes visually and financially more attractive.
Whether you’ve chosen a ducted system for maximum efficiency or a ductless model for convenience, regular maintenance ensures your range hood continues performing optimally. Clean or replace filters according to manufacturer recommendations, wipe down exterior surfaces to prevent grease buildup, and periodically inspect ductwork connections for any loosening or damage. The time and effort invested in proper installation pays dividends through years of reliable operation, making every cooking experience more enjoyable while safeguarding your family’s health and your home’s condition.


