
Creative professionals who’ve made the leap to Apple Silicon know the thrill of blazing-fast rendering and exceptional battery life. Yet many hit an unexpected wall when trying to expand their workspace across multiple external displays. Apple’s M1, M2, and M3 chips, for all their performance gains, impose strict limitations on native external monitor support—a frustrating bottleneck for video editors juggling timelines, designers referencing mood boards, or developers monitoring multiple environments simultaneously. The universal docking station has emerged as the definitive solution to this challenge, transforming a single connection into a full command center with multiple screens, peripherals, and power delivery all flowing through one cable. This article breaks down the technologies that make expanded display setups possible on Apple Silicon, from Thunderbolt 4 bandwidth to DisplayLink’s software-driven approach, and walks you through practical steps to build a multi-monitor workstation that matches your creative ambitions.
Understanding the Apple Silicon Multi-Screen Limitation
When Apple transitioned from Intel processors to its own silicon, it delivered remarkable performance-per-watt improvements but introduced a significant trade-off that caught many professionals off guard. Intel-based MacBook Pros could natively drive up to four external displays through a combination of Thunderbolt ports, making expansive multi-monitor setups straightforward. Apple Silicon fundamentally changed this equation at the hardware level, and understanding why requires looking at how these chips handle display output.
Decoding the M1/M2/M3 Chip Constraints
The base M1 and M2 chips support only a single external display natively—regardless of how many Thunderbolt ports your MacBook has available. The M1 Pro and M2 Pro step up to two external displays, while the Max variants handle three or four depending on configuration. The M3 base chip finally added native dual-display support, but this still falls short for professionals accustomed to three or more screens. This isn’t a software limitation that a future macOS update will resolve; it’s baked into the chip’s display controller architecture. For a video editor who needs a timeline on one screen, a preview monitor on another, and a bin window on a third, or a developer running a browser, IDE, and terminal across separate displays, this restriction creates genuine workflow friction. Simply plugging in additional monitors through adapters or hubs won’t work—the system ignores them without specialized technology intervening. This is precisely where universal docking stations equipped with display compression or virtualization technology become essential rather than optional accessories.
What is a Universal Docking Station? Your Central Hub
A universal docking station is a hardware hub that connects to your Mac through a single cable—typically USB-C or Thunderbolt—and expands it into a full desktop workstation with multiple display outputs, USB ports, networking, audio, and often charging power all delivered simultaneously. The “universal” designation means these docks work across different laptops and operating systems, so if your studio runs both Macs and PCs, the same dock serves everyone. For Apple Silicon users specifically, a well-chosen docking station transforms the single-display limitation into a non-issue by incorporating technologies that route additional video signals through software-level processing rather than relying solely on the chip’s native display controllers.
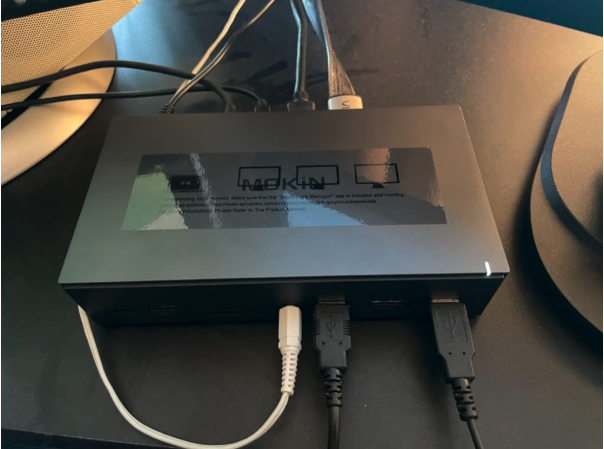
The single-cable philosophy is what elevates a docking station beyond a simple hub or adapter. You arrive at your desk, plug in one connector, and instantly gain access to your entire peripheral ecosystem: external monitors wake up, your mechanical keyboard and reference-grade mouse activate, wired gigabit ethernet connects, and your MacBook begins charging. When you need to leave, one disconnect returns you to portable mode. This eliminates the cable sprawl that plagues many creative desks and reduces wear on your laptop’s limited port selection. For professionals who move between studio and location work—think photographers tethering on set before returning to edit—this seamless transition between mobile and desktop modes saves meaningful time across a workweek.
Core Components of Multi-Port Docking Stations
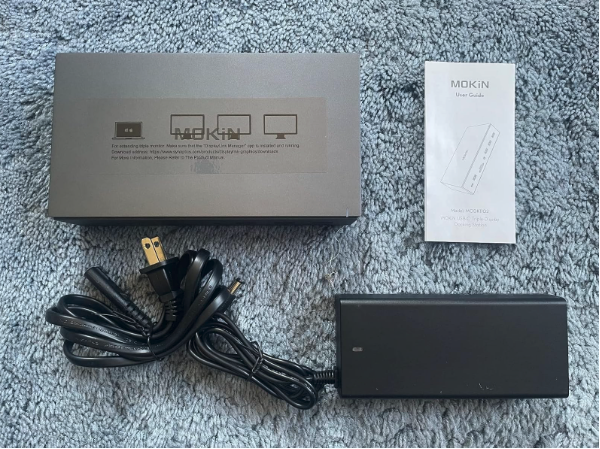
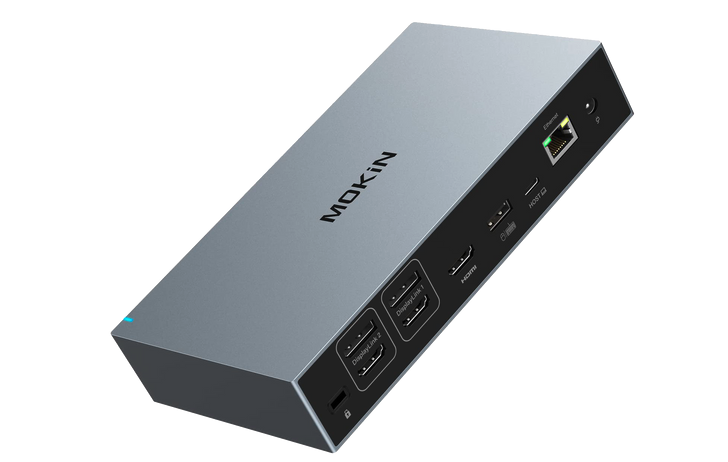
The most capable docking stations for creative workflows include dual HDMI or DisplayPort outputs (sometimes both) for driving multiple monitors at resolutions up to 4K at 60Hz or higher. You’ll find downstream USB-A and USB-C ports for connecting drawing tablets, external SSDs, card readers, and audio interfaces. Dedicated SD and microSD card slots serve photographers and videographers who need fast media ingestion without hunting for separate readers. Gigabit Ethernet provides the stable, low-latency connection essential for uploading large project files or streaming reference footage, while a 3.5mm combo audio jack supports headphones and microphones for video calls or audio monitoring. The best docks integrate upstream power delivery capable of charging your MacBook at full speed, meaning the dock’s single cable handles both data expansion and power simultaneously. This combination of connectivity options in one enclosure is what makes the universal dock a genuine productivity multiplier rather than just a convenience accessory—it’s the central nervous system of a professional Apple Silicon workstation.
Key Technologies: Thunderbolt 4 and DisplayLink Explained
Two distinct technologies power the multi-display capabilities of modern universal docking stations, and understanding how each works helps you make an informed choice about which approach—or combination—fits your creative workflow. Thunderbolt 4 and DisplayLink solve the same problem from opposite directions: one maximizes the native hardware pipeline, while the other creates an entirely separate pathway for video signals that sidesteps Apple’s chip-level restrictions altogether.
Thunderbolt 4: Speed, Power, and Versatility
Thunderbolt 4 delivers 40 Gbps of bandwidth through a single USB-C connector, enough to simultaneously carry display signals, data transfers, and power delivery without compromising any single function. For Apple Silicon Macs, Thunderbolt 4 provides the highest-quality native display connection available—video passes directly through the GPU with zero compression, meaning color accuracy and refresh rates remain pristine for color-critical work in DaVinci Resolve or Photoshop. The protocol supports daisy-chaining, allowing you to connect one Thunderbolt display to another in sequence, though Apple Silicon’s native display cap still applies to how many screens the chip will actually render. Where Thunderbolt 4 truly shines is in its combined role: a single Thunderbolt 4 cable from dock to MacBook can deliver up to 96W of charging power, drive your native display allocation at full resolution, and simultaneously transfer files from connected NVMe drives at speeds exceeding 2,800 MB/s. This makes Thunderbolt 4 docks ideal as the backbone of your workstation, handling power and your primary displays natively while leaving room for DisplayLink to extend beyond those limits.
DisplayLink Technology: Bypassing Hardware Barriers
DisplayLink takes a fundamentally different approach by using software compression and a dedicated chip inside the dock to create virtual display outputs that don’t count against Apple Silicon’s native monitor limit. When you connect a third or fourth monitor through a DisplayLink-equipped dock, your Mac’s CPU and GPU render the frame, the DisplayLink software compresses it, sends it over USB bandwidth to the dock’s processor, which then decompresses and outputs the signal to your monitor. This requires installing DisplayLink’s macOS manager application and granting screen recording permissions in System Settings—a one-time setup that runs quietly in the background afterward. Performance is remarkably smooth for most professional tasks: editing documents, browsing references, monitoring chat applications, and even light video playback work flawlessly on DisplayLink-driven screens. However, GPU-intensive tasks like 3D viewport manipulation, high-frame-rate gaming, or hardware-accelerated video playback may show subtle latency or frame drops on those specific displays. The practical strategy most professionals adopt is running their primary creative application on a natively-driven display while using DisplayLink screens for palettes, reference material, communications, and secondary tools—a configuration that delivers the multi-monitor productivity gains without compromising performance where it matters most.
Choosing the Right Multi-Port Docking Station for Your Needs
Selecting a docking station for your Apple Silicon workflow requires matching the dock’s capabilities to your specific creative demands rather than simply buying the most expensive option available. Start by auditing your daily peripheral needs: count your external displays and their resolutions, identify which devices you connect regularly, and determine whether your MacBook needs full-speed charging through the dock. A photographer working with dual 4K monitors, an SD card reader, and a calibration device has different requirements than a developer running triple 1440p screens with wired ethernet and multiple USB peripherals. Compatibility verification is non-negotiable—confirm that the dock explicitly supports macOS on Apple Silicon, as some older Thunderbolt docks designed for Intel Macs may exhibit quirks or limited functionality. Pay attention to whether the dock uses native Thunderbolt display output, DisplayLink, or a hybrid approach combining both, since this directly affects which monitors deliver GPU-native performance and which rely on software rendering.
Essential Ports and Connectivity for Creative Workflows
For multi-screen creative setups, prioritize docks offering at least two dedicated video outputs—dual HDMI 2.0, dual DisplayPort 1.4, or a combination—capable of driving 4K at 60Hz per display without compromise. Photographers and videographers should insist on built-in UHS-II SD and microSD card slots, which eliminate the need for a separate reader and speed up media imports between shoots. Audio professionals benefit from a dedicated 3.5mm combo jack that bypasses USB audio latency issues during monitoring. Ensure sufficient downstream USB-A 3.2 and USB-C ports to accommodate drawing tablets, external SSDs, control surfaces, and backup drives without daisy-chaining additional hubs. Gigabit Ethernet remains essential for anyone transferring large project files to network-attached storage or collaborating through cloud-based pipelines where Wi-Fi inconsistency introduces frustrating delays during uploads and syncs.
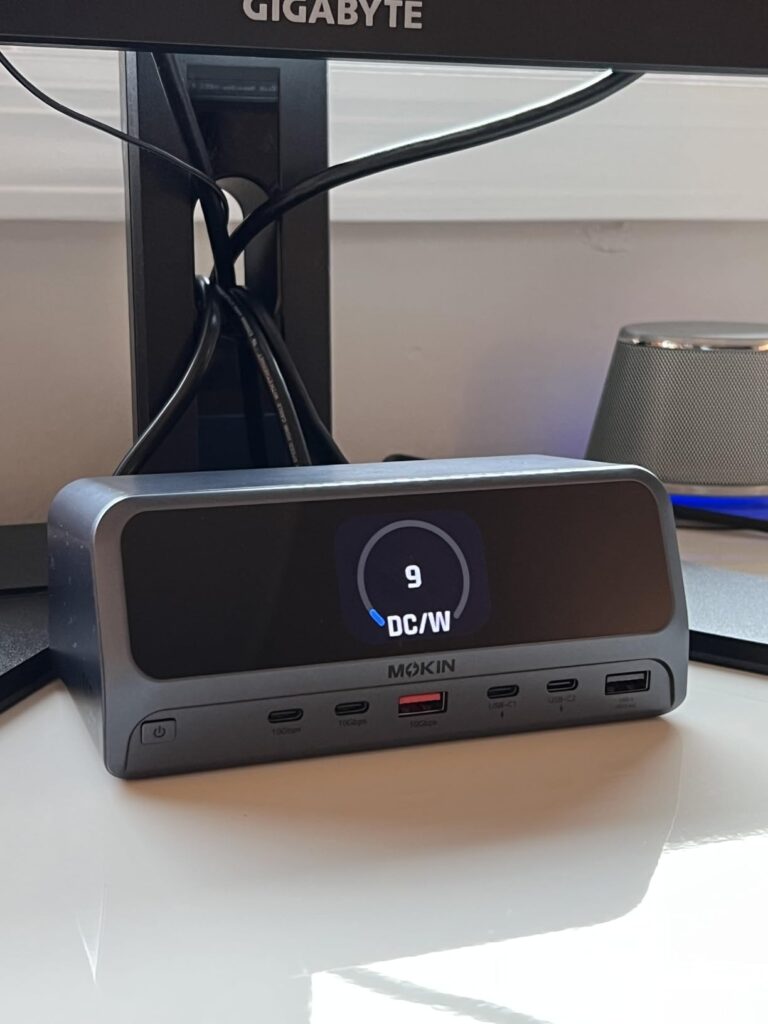
Power Delivery and Performance Metrics
Your dock’s upstream power delivery wattage must match your MacBook’s charging requirements to avoid slow charging or battery drain during intensive tasks. A MacBook Air runs comfortably on 67W, but a 16-inch MacBook Pro with M2 Max demands up to 140W for full-speed charging under load—if your dock delivers only 60W, you’ll notice the battery slowly depleting during heavy renders even while plugged in. Look for docks advertising 96W or higher power delivery for Pro-level machines—brands like MOKiN offer multi-port docking solutions with robust power delivery that address this need for Apple Silicon users. Beyond charging, evaluate the dock’s total power budget for downstream ports: docks that allocate dedicated power per USB port prevent peripherals from browning out when multiple high-draw devices connect simultaneously. Check whether the dock maintains full bandwidth across all ports under real-world load, as some budget options throttle display refresh rates or USB speeds when every port is populated. Reading user reports from fellow creative professionals running similar configurations provides more reliable performance insight than manufacturer specifications alone.
Step-by-Step Setup: Boosting Productivity with Your Docking Station
Hardware Connection and Driver Installation
Start by positioning your docking station centrally on your desk where cable runs to monitors and peripherals remain short and tidy. Connect your external displays to the dock’s video outputs using high-quality cables rated for your target resolution—HDMI 2.0 or DisplayPort 1.4 for 4K at 60Hz. Plug your peripherals into the dock’s downstream USB ports, connect Ethernet if available, and attach the dock’s power adapter. Now connect the single upstream Thunderbolt or USB-C cable from the dock to your MacBook. For native Thunderbolt displays, macOS should recognize them immediately without additional software. If your dock uses DisplayLink for extended displays, download the latest DisplayLink Manager from the manufacturer’s support page, install it, then navigate to System Settings > Privacy & Security > Screen Recording and grant the DisplayLink Manager permission to capture screen content. Restart your Mac once to ensure the driver loads cleanly at startup. After reboot, your additional DisplayLink-driven monitors should activate automatically.
Display Configuration and Workflow Optimization
Open System Settings > Displays and click “Arrange” to drag your monitor thumbnails into positions matching their physical layout on your desk—this ensures your cursor travels naturally between screens. Designate your primary natively-driven display for color-critical or GPU-intensive work by dragging the white menu bar to that screen. Use macOS Mission Control settings to assign specific desktop Spaces to each display, then bind your creative applications to dedicated screens: your editing timeline on the native display, reference materials on a secondary DisplayLink screen, and communications or file browsers on a third. Within applications like Adobe Creative Suite, detach palettes and tool panels onto secondary monitors to maximize canvas space on your primary screen. If you experience display flickering or a monitor failing to wake from sleep, try swapping cable types, updating macOS to the latest point release, or adjusting the dock’s firmware through its companion utility. Keeping DisplayLink Manager updated ensures compatibility with each macOS revision and resolves most intermittent issues automatically.
Transform Your Apple Silicon Mac into a Multi-Monitor Workstation
Apple Silicon’s native display limitations don’t have to define the boundaries of your creative workspace. Universal docking stations, powered by Thunderbolt 4’s raw bandwidth and DisplayLink’s software-driven display virtualization, provide a proven path to the multi-monitor setups that professional workflows demand. By routing additional screens through dedicated processing chips while maintaining native GPU performance on your primary display, these docks deliver the best of both worlds—expanded screen real estate without sacrificing color accuracy or responsiveness where it counts. Beyond multi-display capability, the single-cable connection philosophy eliminates desktop clutter, streamlines your transition between mobile and studio modes, and future-proofs your setup as you upgrade machines or add peripherals. Whether you’re a video editor spreading timelines across three screens, a photographer referencing selects while retouching, or a developer monitoring builds across multiple environments, the right docking station transforms your Apple Silicon Mac from a constrained portable into a fully realized workstation. Audit your display needs, match them against the technologies outlined here, and invest in a dock that grows with your creative ambitions—your productivity will reflect the difference immediately.


