Photos are a way to stay connected to your past.
They remind you about events and stories related to them, but it is not necessary to keep the photo in its original state. You can always edit an image and add elements and exciting backgrounds to make it seem more fantastic. All these fun activities can be performed by using PixCut by Wondershare.
PixCut entertains a wide range of audiences. You can use PixCut to edit an image for social media. It also helps you to design perfect images for marketing and e-commerce purpose.
Not only that, you can use PixCut for personal use. You can do the most amazing things with it, like by replacing an images’ background with something where you wish to go. You can show off your skills by using this golden tool.
Part 1: How to Remove Background of the Images Automatically
PixCut is an online free tool for background removal. The tool has enormous benefits. The most brilliant thing about PixCut is that it has AI-powered tools. Such tools work automatically without bothering the user to do much. In the coming part, we will talk about the steps to remove background from images.
Step 1: Share the Image with PixCut
If you want to remove the background from the image, the first thing is to upload the image on PixCut. After accessing PixCut, you will see a blue bug button saying ‘Upload Image.’ Tap on that button to select the image from your device. Or else, you can also drag and drop it or copy-paste it.

Step 2: Automatic Background Removal
After the image has been uploaded, the AI-powered tools of PixCut will automatically remove the background from your image without asking the user to do much.

Step 3: Download the New Image
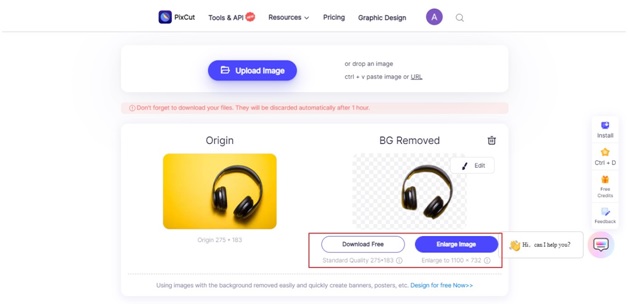
Once the background has been removed, the final result will appear on the screen. You are now supposed to download the new image in either standard or HD quality. Standard download is free whereas, credits are required for HD download.
Part 2: How to Remove Multiple Images Background Online
What is more beneficial than an online tool that is efficient and fast? PixCut is a magic tool because it allows bulk removal of images. It can handle up to 30 images at once without any kind of delay in its speed and efficiency. The following steps will assist you in removing the background of multiple images.
Step 1: Access Bulk Remove Background
Firstly, access the PixCut tool and then scroll down till you see ‘Bulk Remove Background.’ Tap on that feature to open it. Once it opens, either drag and drop the images to remove the background or click on the ‘Upload Image’ button and select the images from your device.
Image name: pixcut-ai-tools-4.jpg
Image alt: access the bulk remover feature

Step 2: Initiate the Process
After you have uploaded all the images, it’s time to remove their background. You will see a button saying ‘Start to remove’; you are supposed to tap on that button to initiate the process of background removal.
Image alt: initiate the background removing process
Step 3: Download the Desired Quality
The AI tools will spontaneously remove the background from all the uploaded images. Once that is completely done, you can now download the images. Download them either in HD from few credits or else download the standard quality for free.

Part 3: How to Remove Watermark and Unwanted Image Objects
PixCut by Wondershare is an online background removal tool with multiple other uses. It is an all-in-one kind of tool. It not only lets you remove background or replace background but instead, you can also remove watermark using this. PixCut is very easy to use and simple to understand, yet if you are a little reluctant to use its watermark removal feature, then here are the steps:
Step 1: Approach Remove Watermark
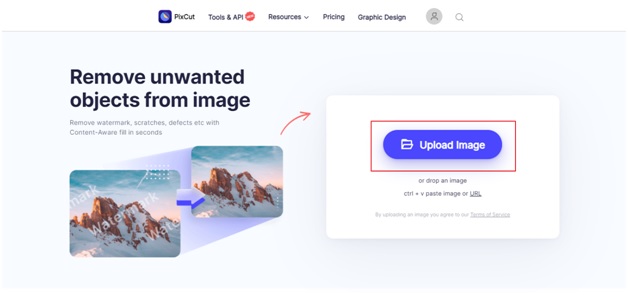
First of all, open the website of PixCut and then access its ‘Remove Watermark’ tool. After the tool has opened, hit the ‘Upload Image’ button or drag and drop the image. You can also copy-paste the URL of the image.
Step 2: Mark and Remove
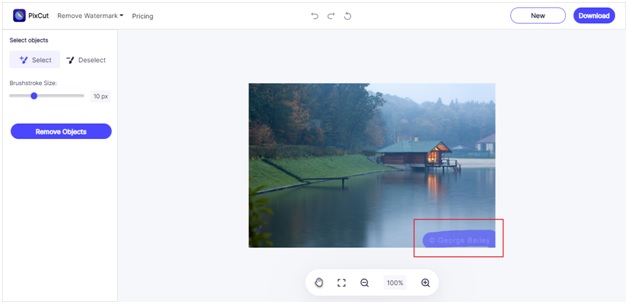
Once the image has been uploaded, you have to mark the objects you want to remove. The ‘Select’ brush is selected by default. You can change the size of the brush stroke. From that brush, mark the area you want to remove and tap on the ‘Remove Objects’ button to erase the watermark.
Step 3: Get Watermark-Free Image
After the watermark has been removed, the image is now ready to download. You can download the image for free in standard quality, and from credits, you can download it in HD.
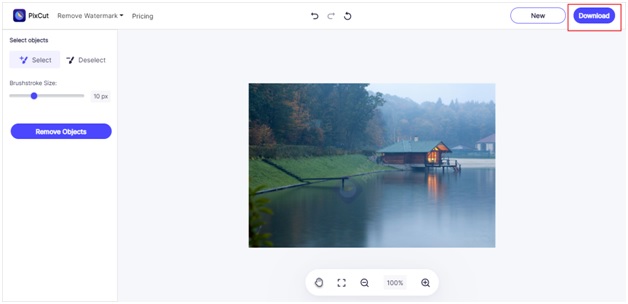
Image alt: download the watermark free image
Part 4: How to Enlarge Image without Losing the Quality
People often say that editing tools damage image quality, but PixCut is a brilliant tool as it promises to maintain any image quality. This section will tell you about steps to Enlarge an image using PixCut without losing its quality.
Step 1: Access Enlarge Image Tool
Once you have opened PixCut, scroll down a little till you find the ‘Enlarge Image’ tool. Open the tool and then start to upload the image. By clicking on the ‘Upload Image’ button, you can upload the image file from your device. You can also drag and drop the image or copy-paste it.

Step 2: Enlarged Image
After the image has been uploaded, the tool will automatically enlarge it. The enlarged image with the size of ‘4x’ will appear in front of you.
Step 3: Ready to Download
Once the size is enlarged, it means that it is ready to be downloaded. Click on the ‘Download’ button and get the image exported to your device.

Ending Words
This article is a complete pack of information regarding Wondershare PixCut as the tool has various features, so few of them have been discussed in the sections above. Not only that, but a step-by-step guideline has also been provided for all the discussed features.


