
A cracked screen on your iPhone 13 Pro can be a frustrating and inconvenient issue. Not only does it affect the functionality of your device but it also diminishes its overall appearance. But replacing the cracked screen can greatly improve your user experience and extend the lifespan of your iPhone 13 Pro. This article will explore the importance of a cracked screen replacement and provide a step-by-step guide for replacing the screen on your iPhone 13 Pro.
Understanding the iPhone 13 Pro Display
The iPhone 13 Pro features a Super Retina XDR display with ProMotion technology and provides users with a stunning visual experience. The display is made of Ceramic Shield which is more durable than previous iPhone models.
This means that the screen is less likely to crack or shatter upon impact. Sometimes, accidents happen and even the most durable screens can still be damaged. It is important to understand the features and materials of your iPhone 13 Pro display to better appreciate the need for a screen replacement.

Signs that Your iPhone 13 Pro Display Needs Replacement
There are several signs that indicate your iPhone 13 Pro display needs replacement. The most obvious sign is cracks or scratches on the screen. These cracks can not only affect the touch sensitivity of your device but also pose a risk of further damage if left unattended.
Another sign is dead pixels or discoloration on the screen. Dead pixels are pixels that no longer light up and result in small black spots on the display. Discoloration can manifest as patches of different colors or a yellowish tint on the screen. Lastly, if you notice that your touchscreen is not responding properly or is lagging then it may be time to replace the display.
Tools and Materials Needed for a DIY Screen Replacement
There are several tools and materials you will need If you decide to replace the screen on your iPhone 13 Pro yourself. These include a replacement screen, a screwdriver set, a spudger tool, a heat gun or hair dryer, adhesive strips, and tweezers. The replacement screen should be compatible with your iPhone 13 Pro model to ensure a proper fit.
The screwdriver set should include the necessary screwdriver sizes to remove the screws on your device. The spudger tool is used to carefully separate the display from the frame without causing damage. A heat gun or hair dryer is used to soften the adhesive before removing the display. Adhesive strips are used to secure the new display to the frame and tweezers are helpful for handling small components during the replacement process.
Step-by-Step Guide to Replacing Your iPhone 13 Pro Display
Replacing the screen on your iPhone 13 Pro may seem like a daunting task. but with the right tools and instructions, it can be done successfully. Here is a step-by-step guide to help you through the process:

1. Power off your iPhone and remove the SIM card tray:

Make sure your iPhone is powered off before starting the replacement process. Use a SIM card removal tool or a paperclip to eject the SIM card tray.
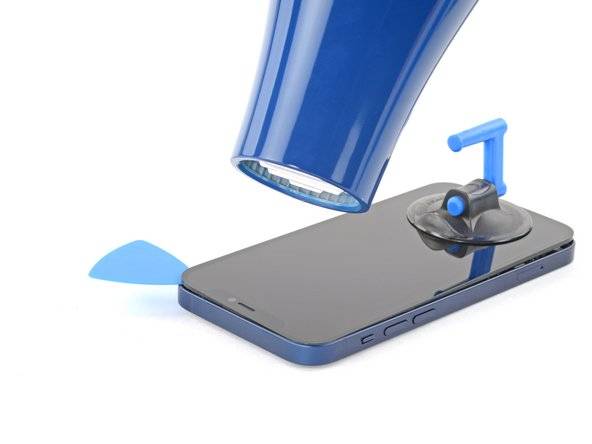
2. Remove the screws at the bottom of the phone and use a heat gun to loosen the adhesive:
Use a screwdriver to remove the screws located at the bottom of your iPhone 13 Pro. Then, use a heat gun or hair dryer to warm up the adhesive around the edges of the display. This will make it easier to separate the display from the frame.
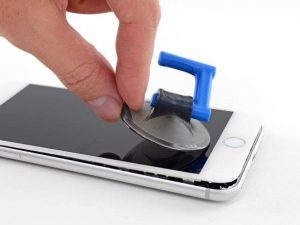
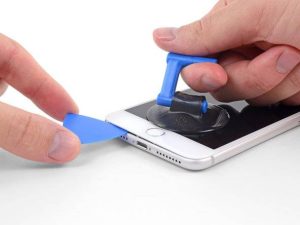
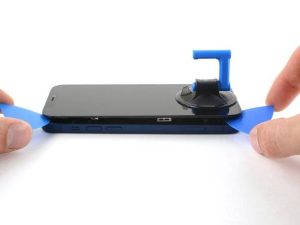
3. Use a spudger tool to carefully separate the display from the frame:
Insert the spudger tool between the display and the frame. Gently pry the display away from the frame, working your way around the edges. Be careful not to apply too much pressure as this can cause further damage.

4. Disconnect the cables and remove the old display:
Once the display is separated from the frame then you will see several cables connecting it to the motherboard. Use a spudger tool or tweezers to disconnect these cables. Then, carefully lift the old display out of the frame and set it aside.
5. Install the new display and reconnect the cables:
Take the new replacement screen and carefully align it with the frame. Make sure all the cables are properly connected to the motherboard. Gently press the display into place and ensure that it is securely attached to the frame.
6. Use adhesive strips to secure the display to the frame:
Peel off the adhesive backing from the adhesive strips and carefully place them around the edges of the frame. Press down firmly to ensure a secure bond between the display and the frame.
7. Replace the screws and SIM card tray:
Use a screwdriver to reinsert the screws at the bottom of your iPhone 13 Pro. Make sure they are tightened securely. Then, insert the SIM card tray back into its slot.
8. Power on your iPhone and test the new display:
Once everything is reassembled then power on your iPhone and test the new display. Check for any issues such as touch sensitivity, dead pixels, or discoloration. If everything looks and functions properly, congratulations! You have successfully replaced the screen on your iPhone 13 Pro.

Conclusion: Enjoying a New Screen on Your iPhone 13 Pro
Replacing a cracked screen on your iPhone 13 Pro is essential for improving its functionality and appearance. By following the proper steps and using the right tools, you can successfully replace the screen yourself.
If you are not comfortable with DIY repairs or do not have the necessary tools, it is best to seek professional help from experts alwtys. A new screen of iPhone 13 Pro will greatly enhance your user experience and extend the lifespan of your iPhone 13 Pro regardless of the method you choose.


